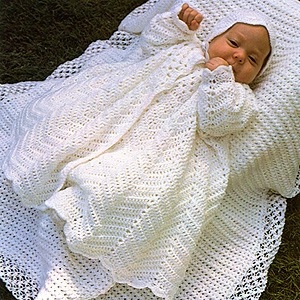
This pair of designs is crocheted using baby weight yarn and a size 2 steel crochet hook. Christening Coat fits newborn to 9 months; Bonnet fits newborn to 3 months.
Gauge
Gauge – the number of stitches and rows per inch – is the key to a well-fitting garment. In each pattern, we have specified a gauge; it is essential that you achieve this gauge in working the garment. Before beginning any garment, take the time to work a gauge swatch in the pattern stitch and with the yarn and hook specified. Change to a larger or smaller hook if necessary to achieve gauge.
note this post contains affiliate links
FREE FOR YOU from Leisure Arts, Inc. ©2013 All rights reserved. These instructions may be photocopied and shared with your friends. They may not be kitted or sold. We have made every effort to ensure that these instructions are accurate and complete.
Abbreviations
beg begin(ning)
ch chain(s)
dc double crochet(s)
rem remain(ing)
rep repeat
rnd round
sc single crochet(s)
sk skip
sl st slip stitch(es)
sp(s) space(s)
st(s) stitch(es)
yd(s) yard(s)
YO yarn over
Size Note: Coat fits newborn to 9 months. Skirt of garment measures 12½” from underarm to lower edge; for use as a jacket, work until skirt measures 6½” long. Bonnet fits newborn to three months.
Materials:
Baby weight yarn, for coat, 5 oz; for jacket, 3 oz; for bonnet, 1 oz
4 buttons ¼” diameter
¾ yd ribbon ¼” wide
steel crochet hook size 2 or size needed for gauge.
Gauge: In dc, 6 sts = 1″; 2 rows = ¾”
Four, 3 dc groups= 2¼”; 6 rows = 2″
Coat
Back Yoke:
Beg at neck edge, ch 61.
Row 1 (right side): 2 dc in 4th ch from hook, sk 2 ch, * 3 dc in next ch, sk 2 ch; rep from * across, ending 3 dc in last ch: you should have 20, 3-dc groups; ch 3, turn.
Row 2: * 3 dc in sp between next two 3-dc groups; rep from * across, ending dc in top of turning ch: you should have 19, 3-dc groups; ch 3, turn.
Row 3: 2 dc in sp between dc and first 3-dc group, * 3 dc in sp between next two 3-dc groups; rep from * across, ending 3 dc in sp between last 3-dc group and turning ch: 20, 3-dc groups; ch 3, turn.
Rows 4-7: Rep Rows 2 and 3, twice.
Row 8: Rep Row 2.
Row 9: Dc in each dc across: 59 dc (counting turning ch as one dc); ch 3, turn.
Row 10: * Sk next dc, dc in each of next 3 dc, 3 dc in next dc, dc in each of next 3 dc (scallop made); rep from * across, ending sk 1, dc in top of turning ch: you should have 7 scallops.
Finish off.
Left Front Yoke:
With wrong side of Back Yoke facing and neck edge at top, join yarn in ch st at upper right-hand corner.
Row 1: Ch 3, (3 dc in sp between next two 3-dc groups) 6 times: you should have 6, 3-dc groups for shoulder. Loosely ch 15 for front of neck; turn, being careful not to twist chain.
Row 2: 2 dc in 4th ch from hook; (sk 2 ch, 3 dc in next ch) 3 times; sk 2 ch, 3 dc in top of first dc of Row 1; (3 dc in sp between next two 3-dc groups) 5 times; 3 dc in turning ch sp: you should have 11, 3-dc groups; ch 3, turn.
Row 3: * 3 dc between next two 3-dc groups; rep from * across, ending dc in top of ch: you should have 10, 3-dc groups; ch 3, turn.
Row 4: 2 dc in sp between dc and first 3-dc group, * 3 dc between next two 3-dc groups; rep from * across, ending 3 dc in turning ch sp: you should have 11, 3-dc groups; ch 3, turn.
Rows 5-8: Rep Rows 3 and 4, twice.
Row 9: Rep Row 3.
Row 10: Dc in base of ch (inc made), dc in each st across, ending 2 dc in top of ch: 34 dc (counting turning ch as one dc); ch 3, turn.
Row 11: Sk 1, dc in each of next 3 dc, 3 dc in next dc, dc in each of next 3 dc (scallop made); * sk 1 dc, dc in each of next 3 dc, 3 dc in next dc, dc in each of next 3 dc; rep from * twice, sk 1 dc, dc in top of turning ch: you should have 4 scallops; finish off.
Right Front Yoke:
Ch 12 (these will be used at the end of Row 2).
Row 1: With wrong side of Back Yoke facing, shoulder edge at top, continue by working 3 dc in sp between 6th and 7th dc group from shoulder edge (Fig. 1); work (3 dc in sp between next two 3-dc groups) 5 times, dc in last ch; ch 3, turn.
Row 2: 2 dc in sp between dc and first 3-dc group; (3 dc in sp between next two 3-dc groups) 5 times, 3 dc in last dc of next 3-dc group; (sk 2 ch, 3 dc in next ch) 4 times: 11, 3-dc groups; ch 3, turn.
Row 3: * 3 dc between next two 3-dc groups; rep from * across, ending dc in top of turning ch: 10, 3-dc groups; ch 3, turn.
Row 4: 2 dc in sp between dc and first 3-dc group of prev row; * 3 dc in sp between next two 3-dc groups; rep from * across, ending 3 dc in sp between last 3-dc group and turning ch: 11, 3-dc groups; ch 3, turn.
Rows 5-8: Rep Rows 3 and 4, twice.
Row 9: Rep Row 3.
Rows 10 and 11: Rep Rows 10 and 11 of Left Front Yoke. Finish off.
Joining Yokes to Form Skirt:
Holding Left Front Yoke with right side facing, and skirt edge at top, join yarn with a sl st in upper right hand corner; ch 3 (counts as one dc), do not turn.
Row 1: Sk next st, * dc in each of next 3 sts, 3 dc in next st, dc in each of next 3 sts, sk 2; rep from * across Left Front Yoke, ending last rep by working to within 3 sts of underarm (2 dc and turning ch); work dec over next 2 sts as follows: (YO, insert hook into next st, YO and pull up a loop, hook yarn and pull through 2 loops on hook) twice: 3 loops rem on hook; hook yarn and pull through all 3 loops; sk turning ch.
Pick up Back Yoke, with right side facing, sk first st, dec as before over next 2 sts (dec just made counts as first dc of next scallop); rep from * to *, ending last rep by working to within 3 sts from end, dec over next 2 sts, sk last st.
Pick up Right Front Yoke, with right side facing, beg at underarm, sk first st, dec over next 2 dc (remember to count dec as first dc of next scallop); rep from * to *, ending last rep by working to within 3 sts from end, dc in next dc, sk next dc, dc in top of turning ch. You should have a total of 15 scallops; the yokes should all be joined and armholes formed; ch 3, turn.
Skirt
Row 1: Sk next st, * dc in each of next 3 sts, 5 dc in next st, dc in each of next 3 sts, sk 2; rep from * across, ending last rep sk 1, dc in top of turning ch; ch 3, turn.
Rows 2 and 3: Sk next st, * dc in each of next 4 sts, 3 dc in next st, dc in each of next 4 sts, sk 2; rep from * across, ending sk 1, dc in top of turning ch; ch 3, turn.
Row 4: Sk next st, * dc in each of next 4 sts, 5 dc in next st, dc in each of next 4 sts, sk 2 sts; rep from * across, ending sk 1, dc in top of turning ch; ch 3, turn. Note: From now on “ending sk 1, dc in top of turning ch; ch 3, turn” will not be repeated in instructions, but indicated as “ending as before.”
Rows 5 and 6: Sk next st, * dc in each of next 5 sts, 3 dc in next st, dc in each of next 5 sts, sk 2; rep from * across, ending as before.
Row 7: Sk next st, * dc in each of next 5 sts, 5 dc in next st, dc in each of next 5 sts, sk 2; rep from * across, ending as before.
Rows 8 and 9: Sk next st, * dc in each of next 6 sts, 3 dc in next st, dc in each of next 6 sts, sk 2; rep from * across, ending as before.
Row 10: Sk next st, * dc in each of next 6 sts, 5 dc in next st,dc in each of next 6 sts, sk 2; rep from * across, ending as before.
Rows 11 and 12: Sk next st, * dc in each of next 7 sts, 3 dc in next st, dc in each of next 7 sts, sk 2; rep from * across, ending as before.
Row 13: Sk next st,* dc in each of next 7 sts, 5 dc in next st, dc in each of next 7 sts, sk 2; rep from * across, ending as before.
Rows 14-24 (or until skirt measures desired length): Sk next st, * dc in each of next 8 sts, 3 dc in next st, dc in each of next 8 sts, sk 2; rep from * across, ending as before on even numbered rows; finish off.
Edging
Skirt:
With right side facing, join yarn with a sl st in lower corner of garment left front. Ch 1, sc in same sp as joining; * sk 3 sts, 6 dc in next st, sk 2, sc in next st, sk 2, 6 dc in next st, sk 2, sc in next st, sk 2, 6 dc in next st, sk 2, sc in next st; rep from * across, ending last rep by working sk 3, sc in last st of lower right front finish off.
Neck: With right side facing, join yarn with a sl st in upper right-hand corner of first group at right front edge; ch 1. Sc in center st of first group, * 2 sc in sp between next 2 groups, sc in center st of next group; rep from * across neck edge.
Left Front Yoke: Work 3 sc in corner, * 2 sc in side of next row; rep from * to beg of skirt.
Left Front Skirt: * 2 sc into dc at end of each row; rep from * to bottom of skirt.
Skirt Edge: Sl st in first sc of skirt edging, * sl st in each of next 6 dc, sc over (into same sp as) next sc; rep from * across lower edge, ending 2 sc in corner sp. Now work right front skirt and yoke to correspond to left front skirt and yoke; join with a sl st to beg sc. Do not finish off.
Neckline:
Row 1: Ch 1, sc in same st, * sk 2 sts, 6 dc in next st, sk 2, sc in next st; rep from * across neckline, adjusting work so it lies flat, ending with sc: you should have 9 scallops. Finish off.
Row 2: With right side facing, join yarn in sc at beg of first neckline scallop, ch 1, sc in same st, * sl st in each of next 6 dc, sc over (into same sp as) next sc; rep from * across neckline.
Finish off.
Sleeves (make 2):
With right side facing, join yarn with a sl st at point where Front and Back are joined at underarm, ch 3.
Rnd 1: Work (2 dc into side of each of next 4 rows, 3 dc into side of next row) 4 times, ending 2 dc in side of each of last 2 rows: you should have 49 dc, counting ch 3 as one dc. Join with a sl st to top of ch 3, ch 3, turn.
Rnd 2: * Dc in each of next 5 sts, 3 dc in next st, dc in each of next 5 sts, sk next st; rep from * around: you should have 4 scallops. Join with a sl st to ch 3; ch 3, turn.
Rnd 3: Sk 1 * dec over next 2 sts, dc in each of next 3 sts, 3 dc in next st, dc in each of next 3 dc, dec over next 2 dc as before, sk 2; rep from * around, join to ch 3; ch 3, turn.
Rnds 4-9: Sk 1, * dc in each of next 4 sts, 3 dc in next st, dc in each of next 4 sts, sk 2; rep from * around, join; ch 3, turn.
Rnd 10: Sk 1, * dec over next 2 sts, dc in each of next 2 sts, 3 dc in next st, dc in each of next 2 sts, dec as before, sk 2; rep from * around, join; ch 3, turn.
Rnd 11: Sk 1, * dc in each of next 3 sts, 3 dc in next st, dc in each of next 3 dc, sk 2. Rep from * around, join; ch 3, turn.
Rnd 12: Sk 1, * dec, dc in next st, 3 dc in next st, dc in next st, dec, sk 2; rep from * around, join; ch 3, turn,
Rnd 13: Sk 1, * dc in each of next 2 sts, 3 dc in next st, dc in each of next 2 sts, sk 2; rep from * around, join; ch 1, turn.
Rnd 14: Sc in ch st and in each st around, join with a sl st; ch 1, turn.
Rnd 15: Sc in ch st, * sk 2, 6 dc in next st, sk 2, sc in next st; rep from * around: you should have 5 scallops, join to beg sc; ch 1, do not turn.
Rnd 16: Sc in same sp with joining, sc over (in same sp as) first sc, sl st in each of next 6 sts, * sc over next sc, sl st in each of next 6 sts; rep from * around, join
Finish off.
Buttonholes: With wrong side facing, join yarn at upper corner of right front, just below scallop, sc in same sp (ch 4, sk 2 sc, sc in each of next 6 sc) 4 times. Then work sc in each sc to end, sl st to scallop on bottom. Finish off.
Sew buttons on opposite side.
Bonnet
Back:
Ch 4, join with a sl st to form a ring.
Rnd 1: Ch 3 (counts as a dc throughout), work 15 dc in ring, join with a sl st to top of ch 3.
Rnd 2: Ch 3, dc in same sp, 2 dc in each dc around; join with a sl st as before: 32 dc.
Rnd 3: Ch 3, * 2 dc in next st, dc in next st; rep from * around, join: 48 dc.
Rnd 4: Ch 3, dc in each dc around, join.
Rnd 5: Ch 3, dc in same sp, * dc in each of next 3 dc, 2 dc in next dc; rep from * around, join: 60 dc.
Rnd 6: Rep Rnd 4.
Rnd 7: Rep Rnd 5: 75 dc.
Rnds 8 and 9: Rep Rnd 4.
Rnd 10: Ch 1, sc in each st around, join: 75 sc.
Center back section is completed and you will now work back and forth in rows.
Top and Sides:
Row 1: Ch 3, dc in each of next 5 sc, (sk 1, dc in each of next 4 sc, 3 dc in next sc, dc in each of next 4 sc) 4 times, sk 1 sc, dc in each of the next 6 sc; ch 3, turn. (Rem sts are left unworked for back of neck.)
Row 2: Dc in each of next 4 dc, (sk 2, dc in each of next 4 dc, 5 dc in next dc, dc in each of next 4 dc) 4 times, sk 2, dc in each of next 4 dc, dc in top of turning ch; ch 3, turn.
Row 3: Dc in each of next 3 dc, (sk 2, dc in each of next 5 dc, 3 dc in next dc, dc in each of next 5 dc) 4 times, sk 2, dc in each of next 3 dc, dc in turning ch; ch 3, turn.
Row 4: Dc in each of next 2 dc, (sk 2, dc in each of next 5 dc, 5 dc in next dc, dc in each of next 5 dc) 4 times, sk 2, dc in each of next 2 dc, dc in turning ch; ch 3, turn.
Row 5: Dc in next dc, (sk 2, dc in each of next 6 dc, 2 dc in next dc, dc in each of next 6 dc) 4 times, sk 2, dc in next dc, dc in turning ch; do not finish off. Turn work so neck edge is at top.
Neck Edge: Ch 3, work 2 dc in side of each dc row, dc in each sc across back of neck, 2 dc in side of each dc row. Finish off.
Finishing: Weave ribbon through dcs of neck edge.