Search Crochet Doll Patterns
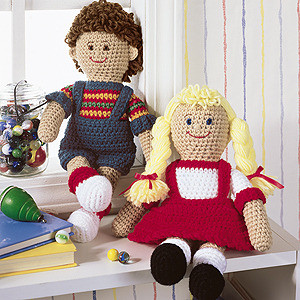
ePattern Forever Friends
affiliate links
Finished Size: 15″ tall each
MATERIALSWorsted Weight Yarn [
[8 ounces (452 yards) per skein
]:
SallyBeige – 1 skein
White – 1 skein
Red – 1 skein
Yellow – 1 skein
Black – 1 skein
CharlieBeige – 1 skein
Blue – 1 skein
Red – 1 skein
Gold – 1 skein
Light Green – 1 skein
White – 1 skein
Brown – 1 skein
Crochet hook, size G
(4.00 mm) or size needed for gauge
Polyester fiberfill Yarn needle
 Embroidery floss
– blue, brown, black, and red for Sally; brown, black, and red for Charlie
Tapestry needle
¼” wide Ribbon – two 12″ lengths (for Sally only)
GAUGE4 sc and 4 rows = 1″
Note: Do not join at end of each round unless instructed. Using a scrap piece of yarn, place marker at beginning of each round, moving marker after each round is complete.SALLY
HEAD
Rnd 1 (Right side): With Beige, ch 2, 6 sc in second ch from hook; do not join, place marker.Rnd 2: 2 Sc in each sc around: 12 sc.
Rnd 3: (Sc in next sc, 2 sc in next sc) around: 18 sc.
Rnd 4: (Sc in next 2 sc, 2 sc in next sc) around: 24 sc.
Rnd 5: (Sc in next 3 sc, 2 sc in next sc) around: 30 sc.
Rnd 6: Sc in each sc around.Rnd 7: (Sc in next 4 sc, 2 sc in next sc) around: 36 sc.
Rnds 8-15: Sc in each sc around.
To decrease, pull up a loop in next 2 sc, YO and draw through all 3 loops on hook (counts as one sc).
Rnd 16: (Sc in next 4 sc, decrease) around: 30 sc.
Rnd 17: (Sc in next 3 sc, decrease) around: 24 sc.
Rnd 18: (Sc in next 2 sc, decrease) around: 18 sc.
Rnd 19: Sc in each sc around.
Rnd 20: Sc in each sc around changing to Red in last sc.
Stuff Head firmly with fiberfill.
BODY
Rnd 1: 2 Sc in each sc around: 36 sc.
Rnd 2: Sc in each sc around changing to White in last sc.
Rnds 3-17: Sc in each sc around.
Rnd 18: (Sc in next 4 sc, decrease) around: 30 sc.
Stuff Body firmly with fiberfill up to 1″ from open edge; lightly stuff remaining portion.
Joining Row: Ch 1, flatten Rnd 18 with wrong sides together and ch-1 at fold; working through both thicknesses, sc in each sc across; finish off: 15 sc.
Note: Mark Joining Row as back of Body.
ARM (Make 2)
Rnd 1 (Right side): With Beige, ch 2, 6 sc in second ch from hook; do not join, place marker.
Rnd 2: 2 Sc in each sc around: 12 sc.
Rnds 3-13: Sc in each sc around.
Rnd 14: Sc in each sc around changing to White in last sc.
Rnds 15-20: Sc in each sc around.
Rnd 21: Sc in each sc around; slip st in next sc, finish off leaving a long end for sewing.
Stuff Arms firmly with fiberfill up to 1″ from open edge; lightly stuff remaining portion.
Sleeve Cuff (Make 2)
With Red, ch 4 loosely.
Row 1: Sc in second ch from hook and in each ch across: 3 sc.
Rows 2-15: Ch 1, turn; sc in Back Loop Only of each sc across.
Finish off leaving a long end for sewing.
Using photo as a guide for placement:
Matching sc on last row to free loops of beginning ch, sew short ends of one Cuff together. Slip Cuff on one Arm; matching top of Cuff to Rnd 15 of Arm, sew Cuff in place along top edge.
With Cuff seam at underarm, flatten open edge of Arm and sew opening closed; matching flat edge of Arm to Rnd 3 on one side of Body, sew Arm in place.
Repeat for second Cuff and Arm.
LEG (Make 2)
With Black, ch 6 loosely.
Rnd 1 (Right side): Sc in second ch from hook and in next 3 chs, 3 sc in last ch; working in free loops of beginning ch, sc in next 3 chs, 2 sc in same ch as first sc; do not join, place marker: 12 sc.
Rnd 2: 2 Sc in next sc, sc in next 3 sc, 2 sc in each of next 3 sc, sc in next 3 sc, 2 sc in each of next 2 sc: 18 sc.
Rnd 3: (Sc in next 2 sc, 2 sc in next sc) around: 24 sc.
Rnd 4: Sc in Back Loop Only of each sc around.
Rnd 5: Sc in both loops of each sc around.
Rnd 6: Sc in next 5 sc, decrease 6 times, sc in next 7 sc: 18 sc.
Rnd 7: Sc in next 5 sc, decrease 3 times, sc in next 7 sc: 15 sc.
Rnd 8: Sc in each sc around changing to White in last sc.
Rnds 9-12: Sc in each sc around.
Rnd 13: Sc in each sc around changing to Beige in last sc.
Rnds 14-23: Sc in each sc around.
Rnd 24: Decrease, sc in each sc around; slip st in next sc, finish off leaving a long end for sewing: 14 sc.
Stuff Legs firmly with fiberfill up to 1″ from open edge; lightly stuff remaining portion.
Sock Cuff (Make 2)
With White and leaving a long end for sewing, ch 18 loosely; being careful not to twist ch, join with slip st to form a ring.
Rnd 1 (Right side): Ch 2 (counts as first hdc, now and throughout), hdc in next ch and in each ch around; join with slip st to first hdc, finish off.
Note: Mark last round as right side.
Using photo as a guide for placement:
Matching wrong side of Cuff to right side of one Leg and having beginning ch of Cuff at top, slip Cuff on Leg; matching beginning ch on Cuff to top of Rnd 13 on Leg and placing Cuff joining at center back, sew Cuff in place along beginning ch.
With shoe facing forward, flatten open edge of Leg and sew opening closed.
Repeat for second Cuff and Leg.
With marked side of Body at back, matching flat edge of each Leg to Body Joining Row, and leaving center sc on Joining Row unsewn, sew Legs to Body.
Knees: Thread
yarn needle
with a 12″ strand of Beige; make a small knot at one end of yarn. With front of one Leg facing, insert needle in side of Leg approximately ¾” from center front and 1″ from top of Sock Cuff; bring needle through Leg and out on opposite side, tugging yarn gently until knot is pulled inside Leg. Insert needle back through Leg one stitch over and out on opposite side; pull yarn gently to indent sides of knee, making additional stitches back and forth through Leg as necessary until knee is desired shape. Knot yarn tightly close to knee; weave end under several stitches and cut close to work. Repeat to form knee on second Leg.
JUMPER
Skirt
With Red, ch 38 loosely; being careful not to twist ch, join with slip st to form a ring.Rnd 1: Ch 2, hdc in next ch and in each ch around; join with slip st to first hdc: 38 hdc.
Rnd 2 (Right side): Ch 2, turn; hdc in next 2 hdc, (2 hdc in next hdc, hdc in next 4 hdc) around; join with slip st to first hdc: 45 hdc.
Note: Mark last round as right side.
Rnd 3: Ch 2, turn; hdc in next 3 hdc, 2 hdc in next hdc, (hdc in next 5 hdc, 2 hdc in next hdc) around to last 4 hdc, hdc in last 4 hdc; join with slip st to first hdc: 52 hdc.
Rnd 4: Ch 2, turn; hdc in next hdc and in each hdc around; join with slip st to first hdc.
Rnd 5: Ch 2, turn; hdc in next 4 hdc, 2 hdc in next hdc, (hdc in next 6 hdc, 2 hdc in next hdc) around to last 4 hdc, hdc in last 4 hdc; join with slip st to first hdc: 59 hdc.
Rnd 6: Ch 2, turn; hdc in next hdc and in each hdc around; join with slip st to first hdc.
Rnd 7: Ch 2, turn; hdc in next 4 hdc, 2 hdc in next hdc, (hdc in next 7 hdc, 2 hdc in next hdc) around to last 5 hdc, hdc in last 5 hdc; join with slip st to first hdc: 66 hdc.
Rnd 8: Ch 2, turn; hdc in next hdc and in each hdc around; join with slip st to first hdc.
Rnd 9: Ch 1, do not turn; sc in same st, ch 3, skip next hdc,

sc in next hdc, ch 3, skip next hdc; repeat from
around; join with slip st to first sc, finish off.
Strap (Make 2)
With Red and leaving a long end for sewing, ch 27 loosely.
Row 1 (Right side): Dc in back ridge of fourth ch from hook and each ch across; finish off leaving a long end for sewing.
Note: Mark last row as right side.
Put Skirt on Sally with joining at center back. Using photo as a guide for placement, sew one end of each Strap to front of Skirt, cross Straps at back, and sew opposite ends of Straps in place on back of Skirt. Tack Skirt in place at waist.
FINISHING
Using photo as a guide for placement:
With blue and black floss, add satin stitches (Fig. 1) for eyes; with brown floss, add straight stitches (Fig. 2) for eyebrows; with red floss, add straight stitches and satin stitches for mouth.With Beige, add satin stitches for nose.
Bangs: With two strands of Yellow, work Turkey Loop stitches (Fig. 3)across top of face, pulling loops up to ¾”.
Braids: Cut one hundred and one 22″ long strands of Yellow. Holding four strands together, place first group flush against backedge of Bangs and sew securely to top of Head at center. Add remaining groups in same manner, placing one directly behind the other to form center hair part. Pull strands into a ponytail on one side of Head and sew between Rnds 11 and 12. Divide strands into three groups (32 strands per group) and braid hair, securing braid 1¼” from bottom with another strand of yarn.Repeat for strands on opposite side of Head.
Trim ends of braids evenly.
Tie one ribbon in a bow around each braid.CHARLIE
HEAD
Rnds 1-19: Work same as Sally’s Head: 18 sc.
Rnd 20: Sc in each sc around changing to Blue in last sc.
Stuff Head firmly with fiberfill.
BODY
Rnd 1: 2 Sc in each sc around: 36 sc.
Rnd 2: Sc in each sc around changing to Red in last sc.
Rnd 3: Sc in each sc around changing to Gold in last sc; do not cut Red.
Rnd 4: Sc in each sc around changing to Red in last sc.
Rnd 5: Sc in each sc around changing to Light Green in last sc; do not cut Red.
Rnd 6: Sc in each sc around changing to Red in last sc.
Rnds 7-10: Repeat Rnds 3-6.
Rnd 11: Sc in each sc around changing to White in last sc.
Rnds 12-17: Sc in each sc around.
Rnd 18: (Sc in next 4 sc, decrease) around: 30 sc.
Stuff Body firmly with fiberfill up to 1″ from open edge; lightly stuff remaining portion.
Joining Row: Ch 1, flatten Rnd 18 with wrong sides together and ch-1 at fold; working through both thicknesses, sc in each sc across; finish off: 15 sc.
Note: Mark Joining Row as back of Body.
ARM (Make 2)
Rnds 1-13: Work same as Sally’s Arm (page 2): 12 sc.
Rnd 14: Sc in each sc around changing to Red in last sc.
Rnd 15: Sc in next sc, place marker around sc just made for Cuff placement, sc in each sc around changing to Gold in last sc; do not cut Red.
Rnd 16: Sc in each sc around changing to Red in last sc.
Rnd 17: Sc in each sc around changing to Light Green in last sc; do not cut Red.Rnd 18: Sc in each sc around changing to Red in last sc.
Rnd 19: Sc in each sc around changing to Gold in last sc; do not cut Red.
Rnd 20: Sc in each sc around changing to Red in last sc.
Rnd 21: Sc in each sc around; slip st in next sc, finish off leaving a long end for sewing.
Stuff Arms firmly with fiberfill up to 1″ from open edge; lightly stuff remaining portion.
Sleeve Cuff (Make 2)
With Blue, work same as Sally’s Sleeve Cuff.
Using photo as a guide for placement:
Matching sc on last row to free loops of beginning ch, sew short ends of one Cuff together. Slip Cuff on one Arm; matching top of Cuff to Rnd 15 of Arm and matching seam to marker, sew Cuff in place along top edge.
With Cuff seam at underarm, flatten open edge of Arm and sew opening closed; matching flat edge of Arm to Rnd 3 on one side of Body, sew Arm in place.
Repeat for second Cuff and Arm.
LEG (Make 2)
With White, work same as Sally’s Leg through Rnd 7: 15 sc.Rnd 8: Sc in each sc around changing to Red in last sc.
Rnds 9-12: Sc in each sc around.
Rnd 13: Sc in each sc around changing to Beige in last sc.
Rnds 14-23: Sc in each sc around.
Rnd 24: Decrease, sc in each sc around; slip st in next sc, finish off leaving a long end for sewing: 14 sc.
Stuff Legs firmly with fiberfill up to 1″ from open edge; lightly stuff remaining portion.
Sock Cuff (Make 2)
With Red, work same as Sally’s Sock Cuff.
Using photo as a guide for placement:
Matching wrong side of Cuff to right side of one Leg and having beginning ch of Cuff at top, slip Cuff on Leg; matching beginning ch on Cuff to top of Rnd 13 on Leg and placing Cuff joining at center back, sew Cuff in place along top edge.
With shoe facing forward, flatten open edge of Leg and sew opening closed.
Repeat for second Cuff and Leg.
With marked side of Body at back, matching flat edge of each Leg to Body Joining Row, and leaving center sc on Joining Row unsewn, sew Legs to Body.
Knees: Work same as Sally’s knees.
SHORTS
With Blue, ch 38 loosely; being careful not to twist ch, join with slip st to form a ring.
Rnd 1 (Wrong side): Ch 2, hdc in next ch and in each ch around; join with slip st to first hdc: 38 hdc.
Note: Mark back of any stitch on last round as right side.
Rnds 2-7: Ch 2, turn; hdc in next hdc and in each hdc around; join with slip st to first hdc, do not finish off.
First Leg
Rnd 1: Ch 2, turn; hdc in next 18 hdc; skip last 19 hdc, join with slip st to first hdc: 19 hdc.Rnds 2 and 3: Ch 2, turn; hdc in next hdc and in each hdc around; join with slip st to first hdc.
Finish off.
Second Leg
Rnd 1: With right side facing, leaving a long end for sewing, and working in skipped hdc on Rnd 7, join Blue with slip st in next hdc from First Leg; ch 2, hdc in last 18 hdc; join with slip st to first hdc: 19 hdc.
Rnds 2 and 3: Ch 2, turn; hdc in next hdc and in each hdc around; join with slip st to first hdc.
Finish off.
Sew opening at inner leg closed.
Strap (Make 2)
With Blue, work same as Sally’s Strap.
Put Shorts on Charlie with joining at center back. Using photo as a guide for placement, sew one end of each Strap to front of Shorts, cross Straps at back, and sew opposite ends of Straps in place on back of Shorts.
FINISHING
Using photo as a guide for placement:
With brown and black floss, add satin stitches
(Fig. 1) for eyes; with brown floss, add straight stitches
(Fig. 2) for eyebrows; with red floss, add straight stitches and satin stitches for mouth.With Beige, add satin stitches for nose.
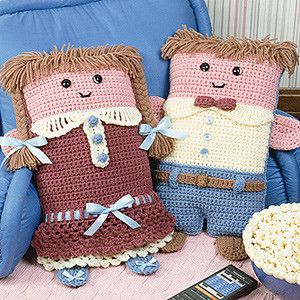
ePattern Pillow DollsEar (Make 2):
With Beige, ch 2, 6 hdc in second ch from hook; finish off leaving a long end for sewing.
Sew Ears to sides of Head.
With two strands of Brown, work Turkey Loop stitches (Fig. 3) for hair on Head, pulling loops up to ¾”.
SATIN STITCH
Satin stitch is a series of straight stitches worked side by side so they touch but do not overlap. Bring needle up at odd numbers and go down at even numbers (Fig. 1).
Fig. 1
STRAIGHT STITCH
Straight stitch is just what the name implies, a single, straight stitch. Bring needle up at 1 and go down at 2 (Fig. 2).

ePattern Samantha Doll
Fig. 2
TURKEY LOOP STITCH
This stitch is composed of locked loops. Bring needle up through a stitch and back down through same stitch (Point A, Fig. 3) forming a loop on right side of work. Insert needle up through stitch to either side of loop (Point B), back down through Point A, and back up through Point B. Begin next stitch at Point B.
Fig. 3
FREE FOR YOU from Leisure Arts, Inc. ©2012 All rights reserved. These instructions may be photocopied and shared with your friends. They may not be kitted or sold. We have made every effort to ensure that these instructions are accurate and complete. We cannot, however, be responsible for human error, typographical mistakes, or variations in individual work.